Fermentation transforms foods, requires little special gear
There’s something mystifying about staring into a murky jar of fermenting peppers.
Like most of us, I’ve learned to associate bacteria with rot, so harnessing “good” microscopic bugs to preserve food feels counterintuitive, not to mention a tad freaky. If done correctly, however, it’s easy to appreciate the complex flavours, tang and even funk found in fermented foods such as kimchi or hot sauce.
“With fermentation, you really have to use your eyes and your nose.”
But judging by the unexpected white, bubbly scum that’s formed on the surface of my peppers, the microbes may have lost some of their magic.

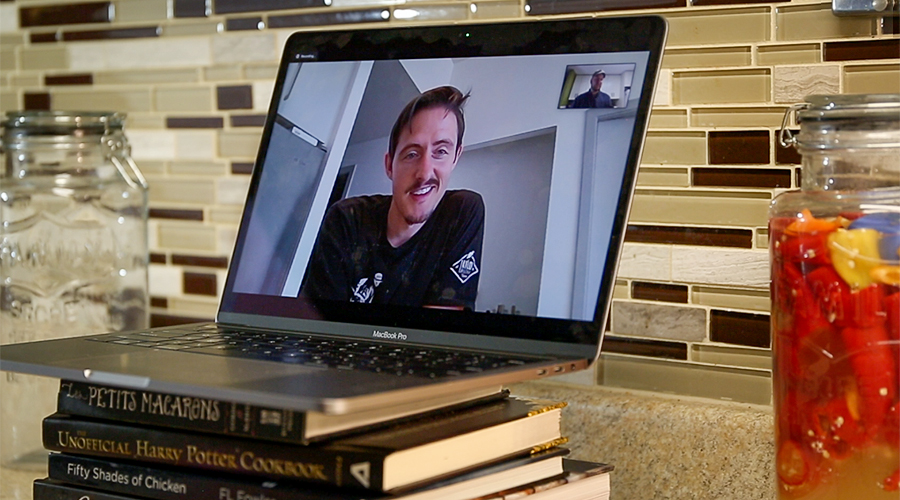
I can scoop away the ooze and hope for the best. But since this is my first attempt at fermentation and I’m not a fan of stomach cramps, I decide to consult an expert: Roger Letourneau (Cook ’10). The Edmonton-based chef oversees the fermentation and pickling program at Meuwly’s Artisan Food Market, which specializes in fermented hot sauces, sauerkraut, kimchi and other house-made products.
“With fermentation, you really have to use your eyes and your nose,” he advises.
I enjoy cooking and experimentation, so trusting my senses is no problem. But since this is new territory dealing with invisible ingredients, Letourneau’s advice will be crucial if I want to give those peppers a fighting chance at becoming remotely edible or, preferably, a zesty addition to tacos, eggs and hot wings. In other words, he’s the perfect guide to troubleshoot microbe mishaps and help me dip my toes into briny – and hopefully not too brackish – waters.
The first rule of fermentation: Do your homework
Any fermentation project, Letourneau says, should start with research. That includes having a basic understanding of what fermentation is: a metabolic process where bacteria break down sugars such as glucose into molecules like lactic acid and carbon dioxide.
For most vegetable ferments, the bacteria and sugars occur naturally. It’s about creating the right conditions – often through the addition of salt – so that desirable bacteria grow instead of nasty bugs or mold.
A lacto-ferment, where lactobacillus bacteria is allowed to thrive, is often slightly tangy from the resulting lactic acid and is associated with good gut health.
Every part of the world has centuries-old traditions of using fermentation to make products from sourdough bread to yogurt and cheeses to pickled vegetables to beer and wine. In North America, fermentation fell out of favour with the rise of refrigeration but it’s now part of a culinary – and a pop culture – resurgence.
Letourneau attributes this to the influence of trailblazing chefs like René Redzepi, whose acclaimed Danish restaurant Noma is renowned for transforming hyperlocal ingredients into fermented blueberries, lacto plums, kombucha and even garum, a type of fish sauce that was the ketchup of Ancient Rome.
Letourneau says there are a number of books the home cook can refer to (including one from Noma if you’re interested in making your own garum). But homework should also rely on using your tastebuds and knowing what a lacto-fermented pickle tastes like, which is different from most pickles at the grocery store, and especially what foods you actually want to eat.
“Spend a little bit of time digging and figuring out, what am I trying to achieve and how do I get there?” he says.
The second rule of fermentation: Focus on the ingredients
Letourneau spent time figuring out fermentation while working in Belgium at a farmhouse restaurant where everything was made in house – including naturally fermented sodas and miso.
At home, he’s experimented with creating different types of vinegar. During our Zoom interview, he produces a magnum of sparkling wine filled with locally grown cranberries that had been fermenting since the previous fall. He also experiments with Alberta craft beer – think malt vinegar but not as “crude,” he explains. Both types of vinegars rely on the addition of yeasts.
“You can get more nuance with the different types of malts, the addition of hops, flavours and aging techniques.”
“If you’re going to start with fermentation, you really want to find the highest quality ingredients.”
Letourneau strongly recommends using local ingredients where possible. It’s one of the reasons he’s interested in making vinegars with beer instead of wine.
 “Wine vinegar is very popular but there’s not a lot of wine made in Alberta. Beer is a big commodity here.”
That local focus isn’t just a chef being extra “chefy.” It goes back to the science of fermentation and harnessing bacteria – the good and bad, he says.
Mass-produced cranberries, for example, get washed, packaged and shipped hundreds of kilometres over several days before landing in your grocery store’s produce department.
By that point, they lack the surface yeast, bacteria and nutrients needed for good fermentation.
“If you’re going to start with fermentation, you really want to find the highest quality ingredients and work backwards from there.”
The third rule of fermentation: Keep it simple
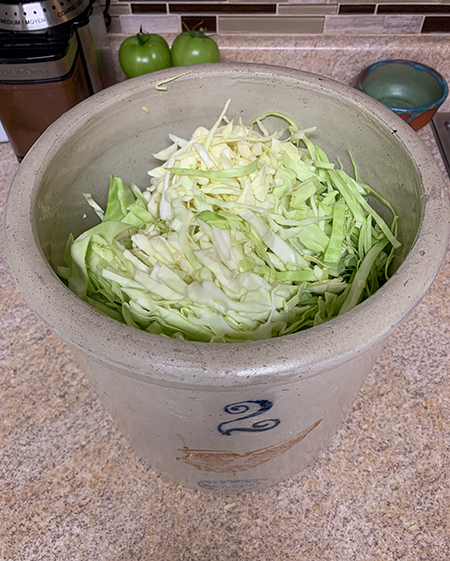
Just like a science experiment, fermentation has variables that can affect the outcome. If you’re a rookie like me, stick to the basics. Making sauerkraut, for example, can be as simple as massaging salt into chopped cabbage until enough moisture is pulled out to form a brine that helps control bacteria growth. (More on that later.)
“If you’re doing a recipe with 20 different things, it’s just not advisable,” Letourneau says. “You really can’t troubleshoot as to why things go wrong when they do go wrong.”
And they do. Trust me.
The fourth rule of fermentation: Oxygen is death
One of the appeals of fermentation for me is you need only a few pieces of equipment to be successful. A kitchen scale is the one thing Letourneau says makes life easier, especially for calculating salt solutions. A mason jar or classic crock pot can get the job done provided you take steps to keep oxygen at bay.
Recipes like my hot sauce rely on an oxygen-free, or anaerobic, environment that allows lactobacillus to thrive.
“Oxygen will feed mold.”
“Oxygen will feed mold,” says Letourneau, which is why he prefers a vessel with an airlock lid to keep oxygen away.
It’s important to keep the ferment moving by stirring or shaking daily, remembering to re-secure the lid. If you’re using mason jars, that also means “burping” the container daily by opening the lid and releasing carbon dioxide. Forgetting that step can be explosive, literally, as the gas has nowhere to escape, he adds.
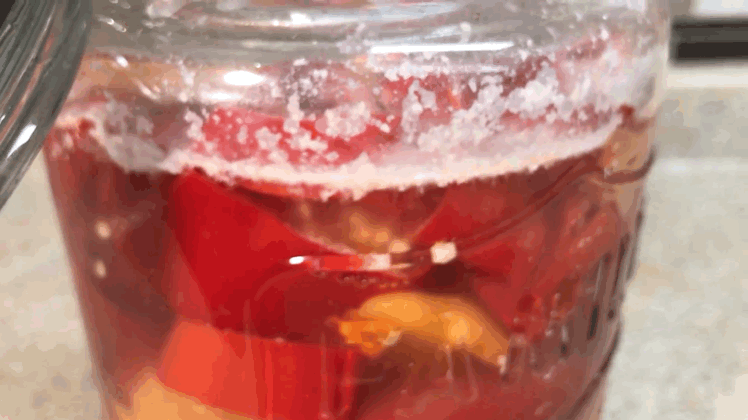
In the case of my peppers, they were submerged with a few cloves of garlic in a 5% saltwater brine in a glass jar. (The grams of salt needed is calculated by multiplying the weight of water by 0.05. I made two litres of brine to be sure I had enough to fill the jar.) But the problem with foods like peppers is they float, and therein lay at least one of my problems.
The fifth rule of fermentation: Expect some trial and error
My inexperience showed in my selection of vessels. Instead of a mason jar, I used a vessel with a snap-top lid. It was the perfect size for the amount of peppers I purchased but the rubber seals didn’t keep oxygen out. I realized later that I should have used a weight to keep the peppers fully submerged and not exposed to air. Surface scum – and worry – ensued.
A video consultation with Letourneau revealed this substance, likely kahm yeast that grew because the peppers came in contact with oxygen, wasn’t mold and probably wasn’t anything to worry about. He advised me to scrape it off, shake the mixture daily and give it at least 10 days before sampling to see how it tastes.
“Often you’re trying to end up with this [product] and you end up with something different, and that’s normal,” he says. “I think that’s the point of fermentation, having a bit of variation.”
Epilogue: No cramps!
Scooping didn’t eliminate the yeast but after waiting the recommended number of days I worked up the nerve to try a pepper. It was hot, tangy and had a mild but pleasant funk. I could taste the garlic, and the passing hours and days yielded no signs of gastrointestinal distress. Success! Once blended and stored in an airtight bottle in the fridge, it can last several months.
I’ve since experimented with fermented pickles and am on my second crock of cabbage that’s bubbling into sauerkraut. I want to give kimchi a try too, but right now my focus is on a potentially lethal amount of habanero peppers for a new batch of hot sauce.
There’s a satisfying hiss from escaping carbon dioxide
Cracking open the jar, there’s a satisfying hiss from escaping carbon dioxide, which tells me lactobacillus is still at work. My nose confirms it, detecting a slightly sour odour along with a whiff of the pepper’s distinctive fruitness.
The peppers are mostly scum free and still have a slight crunch – and a heat intense enough to sear taste buds. I could blend it into a sauce right now, but I decide to wait and see how it evolves. I don’t know if it’ll get hotter, brighter, better or worse but that’s the point. That’s the mystery.
How to make lacto-fermented hot sauce – a rookie’s method
Ingredients
- 650 grams of chili peppers (I chose Fresno chilies, which have a great flavour but aren’t super hot. Feel free to use whatever you want.)
- 2 litres of water (It’s better to make too much rather than need to make more part-way through when your hands are covered in capsaicin. Trust me. I also recommend wearing gloves when handling peppers.)
- 100 grams of kosher salt (for a 5% brine)
- 2 cloves of purple garlic (a preference thing, grown locally)
Method
- Use a knife to remove the stems of the peppers. Don’t forget the gloves!
- Remove seeds if you want less heat. I did not bother, but I like it hot.
- Pack peppers and garlic into a vessel such as a mason jar, preferably one with an airlock.
- Add salt to the water and stir until dissolved.
- Cover peppers with the brine.
- If you’re not using an airlock, add a small weight to ensure the peppers are fully submerged. (You could use a zip-top bag filled with brine.)
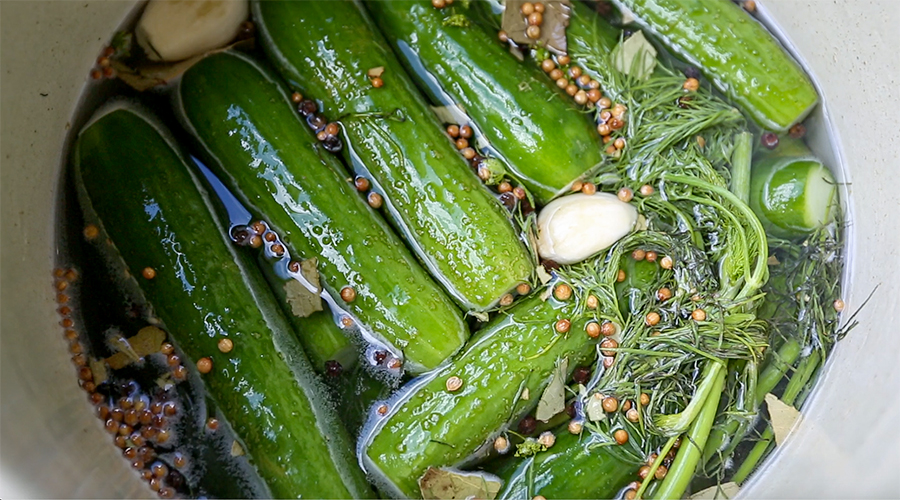
- Leave out at room temperature for at least 10 days, stirring or shaking the mixture daily. The brine will appear cloudy after a few days.
- If you’re not using an airlock, don’t forget to burp the container daily. This is super-satisfying and releases CO2 gas that would make the jar explode if left unchecked. After a few days when the fermentation really gets intense, this gas release will start to look and sound like soda. Cool, huh?
- After 10 days, it’s time to taste a pepper. Knowing when it’s ready is subjective (and a bit of guesswork when you’ve never done it before), but I went for slightly sour and not too salty, and then blended into sauce.
- If mold or other junk appears on the surface, consult an expert like a NAIT grad! When in doubt, throw it out and start again.
- Once blended, dab or pour over tacos, chicken wings, nachos or whatever your heat-seeking heart desires!